How to Record A Zoom Meeting in 5 Easy Steps

Learning how to effectively utilize business tools like recording a Zoom meeting might seem challenging for newcomers, particularly important for those embarking on a new business venture.
No worries though! Once you understand the basics, of how to record a Zoom meeting, it’s easy.
The ability to record Zoom meetings is a lifesaver for businesses. Whether it’s for revisiting key points from client calls or sharing important team discussions with absent members, recording your virtual interactions has never been more crucial.
In this friendly guide, we’ll break down how to record a Zoom meeting in easy-to-follow steps. So sit back and let’s dive right into making tech work for us!
What Are The Basics to Recording Zoom Meetings
For those thinking of starting a business but unsure where to begin, mastering Zoom meetings is a valuable step in building a tech-savvy foundation for your future venture.
Zoom offers two types of recordings: local recordings and cloud recordings. If you’re utilizing the free version of Zoom, your recordings will be stored on your computer’s hard drive when the conference is over. This means that once the meeting ends, the video file is saved directly onto your computer’s hard drive.
If, however, you have upgraded to one of the paid Zoom accounts (Pro/Business/Enterprise), then alongside the local storage option, there exists another exciting feature called ‘cloud recording’.
When enabled by the host during a live session, it ensures automatic saving occurs within secure servers present inside the Zoom Cloud.
The biggest advantage here is accessibility, as users get the freedom to download their files anytime, irrespective of where they’re located, provided internet connectivity isn’t an issue.
Reasons you need to know how to record a Zoom meeting
- With the ability to record Zoom meetings, you can capture important information that can be referred back to later on.
- You can easily share information with others which makes it much easier for everyone to stay up-to-date on what was discussed and any decisions that were made during the meeting.
- As a Reference Tool, you can simply refer back to the Zoom recording for clarification or further information.
Finally, when you record your Zoom meetings, you can easily reuse content from previous Zoom meetings in future ones without having to recreate it from scratch each time. This saves time and energy while still ensuring that all relevant information is included in each Zoom meeting going forward.
Before we dive into details though, always remember that recording conversations should only be done with consent from all parties involved.
Step-by-Step Guide to Record a Zoom Meeting as a Host
If you’re hosting a Zoom meeting, capturing the Zoom meeting can be pretty straightforward. But first things first – make sure that your Zoom desktop app is up-to-date for optimal performance and full access to all features.
1. Kick off your scheduled Zoom call on the desktop app.
2. Locate the ‘Record’ button at the bottom of your screen during an ongoing session and select it.

3. You’ll then see two options: ‘Record on this Computer’ (local recordings) or ‘Record to Cloud’ (cloud recording). Choose according to your preference or subscription plan. Note though – cloud storage is only available for paid subscribers.
4. The moment an option is selected, the recording starts immediately. You’ll notice ‘Recording…’ appear, indicating the successful initiation of the capture process in the upper left corner of the interface.

During the call, feel free to pause or stop by clicking the respective buttons, replacing the record button once it’s active.

This provides flexibility in determining when exactly the content gets captured, which is useful if there are sensitive parts within the conversation not meant for a wider audience later.
How to Record a Zoom Meeting as a Participant
Receiving Permission for Participant Recording
In an ideal scenario where hosts permit participants to freely record Zoom meeting, here’s what needs to be done.
During your ongoing Zoom call on the desktop app,
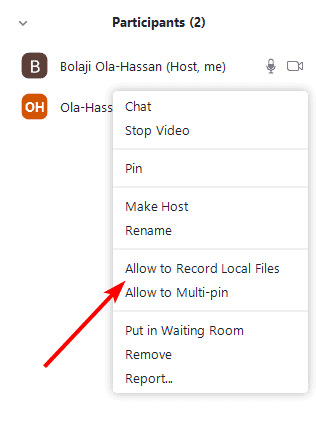
1. Click ‘Participants’ in your control bar and then select ‘More’ next to your name.
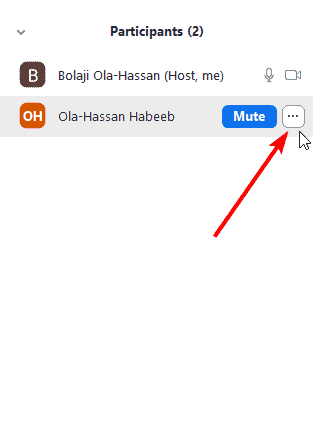
2. Here lies the golden ‘Ask for Recording Permission’ option – clicking which sends a request to the host.
If they grant permission (fingers crossed.), you’ll receive a notification allowing you to start screen recording immediately using either the ‘Record’ button at the bottom of the screen or the Alt+R shortcut key combo.
A red dot appearing means “you’re recording”. And yes – pausing/stopping is possible anytime via the controls available in the top-left corner of the screen during live Zoom recordings.
Recording From Different Devices without permissions
Different devices might have slightly varied processes due to their unique interfaces, but the core principles remain the same across the board, whether it’s a Windows 10 machine, a Mac computer, an Android device, an iPhone, a Chromebook laptop, or even an iPad tablet device.
- Windows 10: The Xbox Game Bar application comes pre-installed, offering native screen recording functionality suitable not only for gaming but also for online meetings, including those conducted via the Zoom app.
- iOS Devices: iPhones and iPads both offer integrated screen recorder features accessible through the Control Center settings menu, allowing simultaneous audio/video captures during an ongoing call.
How to record a Zoom meeting in Windows 10
1. Close all windows on your screen except the Zoom call you wish to record.
2. To access the Xbox Game Bar, simply navigate to the Start menu. Alternatively, you can open the recorder by pressing the ‘Windows key + G’.
3. To start recording in the Xbox Game Bar app, simply click the “Start Record” button or press the keyboard shortcut ‘Windows logo key + Alt + R’.
4. Begin your Zoom meeting as you normally would, while the Windows Game Bar quietly captures your Zoom Meeting on the desktop.
5. Once you’ve finished Zoom recording, stop the session and click on the pop-up notification indicating that your Zoom recording file has been saved. This will direct you to the documents folder where your Zoom recording is stored.
How to record a Zoom meeting on iOS
1. Open your Zoom meeting and set everything you need to up.
2. On your keyboard, press and hold Command + Shift + 5.
3. Select whether to record a window on your screen, a portion of your screen, or your entire screen.
Since you’re recording a Zoom meeting, we suggest selecting the Zoom Window as what you’d like to record.
4. Your screen recording will begin after you make your selection.
5. Click Stop recording to end your recording.
How to Record a Zoom Meeting on Android Devices Without Permission
1. To access your Quick Settings and activate the Screen Recorder feature, simply swipe down twice from your home screen and tap on the dedicated button.
2. Select your audio and video versions, and then choose Start Recording.
3. You see a countdown followed by your screen recording.
You will also notice a screen recording toolbar that allows you to effortlessly add annotations, feature a small video avatar of yourself and unlock additional functionalities.
4. Start your Zoom Meeting as you normally would. When you have finished, simply click on the Stop button located on the recording toolbar.
You’ll get a notification that your recording is saved. Go to your gallery where you can find your recorded Zoom Meeting in the Screen recording album.
Using Third-Party Software For Recording Zoom Meetings Without Permission
When it comes to recording Zoom meetings, you’re not limited to the built-in features of the app or device. There’s a whole world of third-party screen recorders out there ready to offer more comprehensive solutions. Two such recording software are Camtasia and TechSmith Snagit
Please bear in mind: these methods should only ever be used after receiving explicit approval from everyone present in the conversation, as breaching trust could lead to serious repercussions, including potential legal action under certain circumstances.
Key Considerations for Successfully Recording a Zoom Meeting
Recording a Zoom meeting might seem like a walk in the park, but there are several factors you need to keep tabs on for an effortless and successful recording experience. These considerations will ensure that your recorded content is not only clear and professional but also useful.
A Stable Internet Connection: Your Best Friend
The importance of a stable internet connection cannot be overstated when it comes to recording Zoom meetings. Any hiccups or lags can lead to video stuttering or audio issues in your recordings. If possible, switch from Wi-Fi connectivity to using an Ethernet cable – trust me; this small change could make all the difference.
Your Device’s Storage Space: The More, The Merrier
If local recording is what you’re aiming for (especially with free version users), ensuring enough storage space on your device becomes crucial. You wouldn’t want to run out of memory mid-recording, interrupting the process, now would we? So do yourself a favor – regularly clean up unnecessary files from your device.
Capturing Audio Along With Video Content: Double Whammy.
In addition to capturing video content during Zoom sessions, don’t forget about audio. Make sure everyone’s voice, including yours, sounds loud and clear throughout the entire duration, especially those speaking remotely with varying sound quality levels. TIP: Investing in good-quality microphones and headsets drastically improves the overall audio capture output. Remember to enable the ‘Record Computer Audio’ option under ‘Audio Settings’ prior to any meeting commencement to ensure every participant’s voice gets captured without fail.
Bearing Legal and Privacy Concerns in Mind
Last but definitely not least, always respect privacy laws while conducting screen recorder activities, particularly those involving sensitive information discussions. Ensure each attendee gives their consent prior to starting recording, as some jurisdictions legally require permissions. Adding a disclaimer at the beginning, informing attendees of the ongoing recordation, helps maintain
Enhancing Your Zoom Recordings: Taking It To The Next Level
So, you’ve recorded your Zoom meeting. Now what? Well, there’s more to it than just hitting the record button and saving the file. You can transform that raw video into something much more refined and professional-looking.
Add Some Polish with Post-Production Editing
A good place to start enhancing your content is by using post-production software like Final Cut Pro X. This allows you to cut out any unnecessary parts, add smooth transitions between different sections, or even adjust audio levels for clear communication.
Incorporate Captions/Subtitles for Accessibility
Adding captions or subtitles to your Zoom recordings can make them more accessible to a wider audience. It helps individuals with hearing impairments or those who prefer to read along while watching the video. Many video editing programs, such as Final Cut Pro X, provide capabilities to conveniently affix captions or subtitles to your recordings.
Better Audio Equals Better Engagement
The quality of audio in a recording plays a significant role in how engaging it turns out. Investing in high-quality microphones ensures better sound capture during meetings, while dedicated audio-editing software could significantly improve the clarity of spoken words. For instance, Final Cut Pro X offers noise reduction among other useful features. Remember – Good audio equals clearer communication.
Create Highlight Reels For Quick Recaps
Sometimes long discussions may result in key points getting lost amid all the information shared. A highlight reel summarizing important moments serves as an effective recap tool after lengthy sessions. You don’t need extra equipment either – simply select impactful moments during post-production edits when creating reels. Note: While enhancements elevate quality, they do require additional time and resources, so plan accordingly.
Conclusion
How to record a Zoom meeting is no longer a daunting task. You’ve now got the basics down pat.
Whether you’re hosting or just participating, we’ve covered all angles.
Different devices? No problem. We’ve detailed how to record a Zoom meeting on each one of them.
You even know about third-party screen recorders and alternatives to Zoom recording for added flexibility and quality.
Remember those key considerations like internet connection, storage space, and audio capture? They’ll ensure your recordings are seamless every time.
Taking it up a notch with editing tools post-recording can make your content shine brighter than ever before. Accessibility matters!
Dive in today – it’ll change the way you do business!