5 Quick Steps On How To Create a Discord Server

How to create a Discord server can be a daunting task for many entrepreneurs and small businesses.
The thought of setting up roles, channels, and bots… It can be dizzying to consider the setup of roles, channels, and bots. And let’s not even get started on the fear of technical glitches or managing an online community. It’s like building a virtual team from scratch!
But here’s the truth – without mastering how to create a Discord server, you’re missing out on one of today’s most powerful communication tools for businesses.
What is Discord
Discord, as an all-in-one virtual workspace, could be the key communication tool for those starting a business with no initial ideas, providing a platform for productivity and collaboration.
On Discord, you can create a server to organize channels where team members can communicate with each other using voice or text. You can create channels based on specific topics, projects, or departments so that everyone can stay on the same page.
Plus, you can invite external collaborators, like freelancers or clients, to join in on the conversation too. Business is all about communication and Discord can give small business owners and entrepreneurs an affordable, intuitive, and effective way to stay connected with their team.
Reasons you need to know how to create/setup a Discord server
In the world of entrepreneurship and business, it’s essential to have efficient communication channels. This is where creating a new Discord server comes in handy. As an entrepreneur myself, I’ve found Discord to be incredibly beneficial for my business.
Not only does it allow for real-time conversation with team members and clients alike, but there are also various automation tools designed specifically for Discord that can streamline your workflow.
Before you start
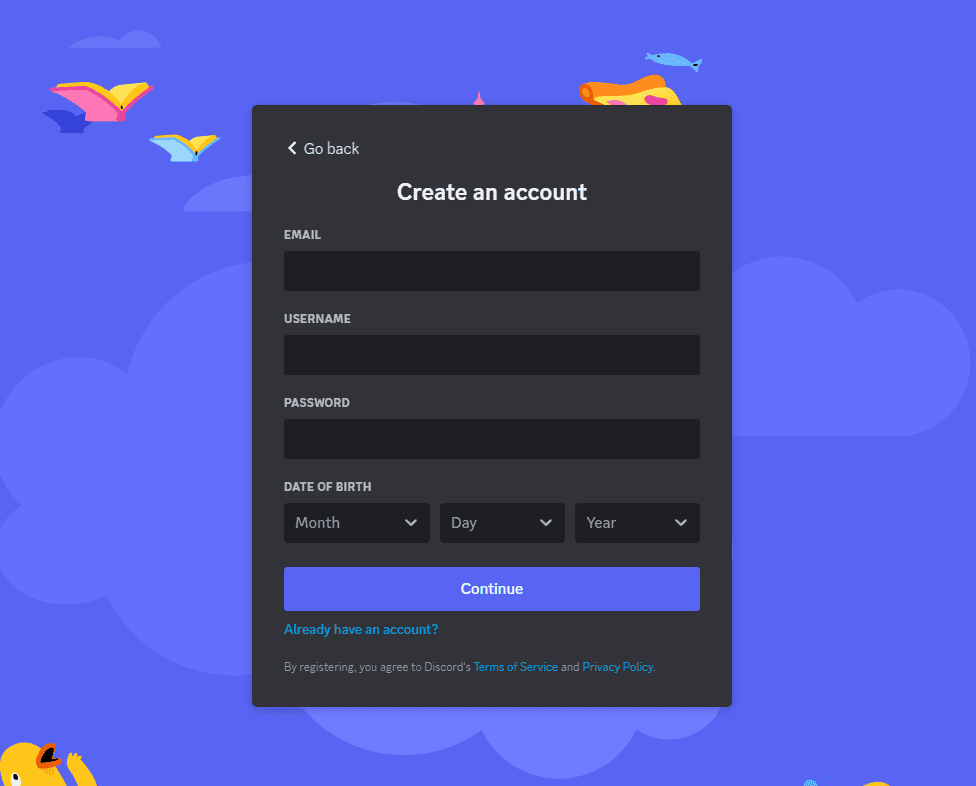
To get started on this journey of enhanced communication and collaboration, you’ll first need a Discord account.
If you don’t already have one, head over to Discord’s registration page, and fill out some basic information such as email address, username, password, and date of birth – voila! You’re ready to dive into the dynamic world of Discord servers.
If you plan on managing multiple servers or want separate Discord accounts for personal use and business operations – no worries! Simply create another account using a different email address.
Once your account(s) are set up, open Discord either via their website or through their user-friendly app available across all major platforms.
Step-by-step guide on how to create a Discord server
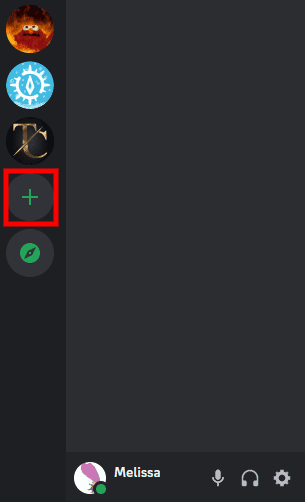
Step 1:
To start creating your server, click on the ‘+’ icon located on the left side below any existing server icons if any.
Step 2:
A prompt will appear asking whether you’d like to use a template or start from scratch; choose whichever option best suits your needs.

Step 3:
You’ll then be asked whether this server is intended just for friends or a club/community
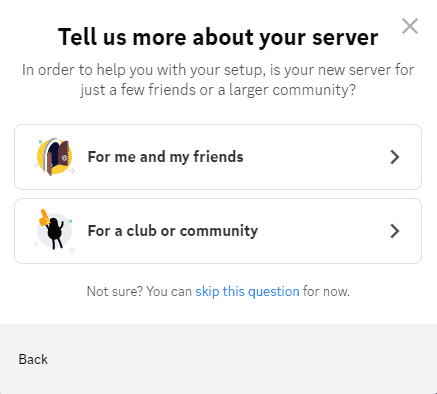
Make sure what fits better with your goals: private brainstorming sessions among colleagues? Or perhaps an interactive platform where potential customers can engage directly with each other?
Step 4:
The next steps involve uploading a unique server icon and choosing an engaging name that reflects its purpose well enough. Remember that this icon will show up in every member’s list who joins – so make sure it stands out!
Step 5:
The final step is clicking ‘Create’.
Congratulations! You created a Discord server.
Key Considerations for Success while creating a Discord server
Establishing a functional and effective Discord server requires thoughtful planning. The key lies in understanding the purpose of your server, defining roles clearly, and creating channels for communication.
Becoming Part Of The Community
If public engagement aligns more closely with your plans, consider turning into ‘Community’ mode under settings after the creation process ends successfully.
A community server introduces additional functionalities such as improved moderation tools, analytics, etc., making management tasks easier when dealing with large groups of users simultaneously, thus saving time while increasing efficiency significantly.
Taking it to the next level: how to set up options for your Discord server
Creating Roles on Your Server
To create roles that align with your business needs, navigate to ‘Server Settings’ and then select ‘Roles’. This is where you can add new ones by clicking ‘+’ (plus sign), assigning it a name, and setting permissions based on tasks each role should perform.
You might consider Admins who manage overall settings or Moderators monitoring chat and chatrooms for inappropriate content. There could also be Members with standard privileges or Guests with limited access; these are just examples, so feel free to customize as per requirement.
Setting up Channels
A channel serves as an individual space within Discord where users interact about specific topics. These come in two types: text channels (for typed conversations) and voice channels (for voice communication).
Create one by going back into ‘Server Settings’, clicking on ‘Channels’, then choosing either ‘+ Text Channel’ or ‘+ Voice Channel’. Name them appropriately – perhaps something like ‘#general-chat’ for general discussions, ‘#tech-support’ for IT-related queries, or ‘#announcement channels’ for server-wide announcements- this helps members understand their purpose at first glance.
Inviting Members To Your Server
A well-structured but empty new Discord server isn’t much use. It’s time now we invite people over.
Sending Direct Invites
If you have identified individuals whom you wish to include in your Discord community, sending direct invites is straightforward.
Click on your server name which brings down a dropdown menu. From there, selecting ‘Invite People’ opens up options including sending invitations via email directly from Discord itself or copying an invitation link that can be shared through other platforms.
Using an Invitation Link
An invitation link offers a simple and efficient way to invite new users to your server.
To create one, navigate to your discord server settings and select ‘Invite People’. You’ll then receive a unique URL that can be shared with potential members across various platforms.
This method allows for mass sharing – ideal if you’re looking to add large numbers of new members simultaneously. The permissions associated with each invite link provide customization options too; this means you have control over the access level new members will possess when they join.
Sending Direct Messages (DMs)
If personalization is more in line with how you want things done, sending invitations through direct messages could work better for you.
To invite friends, simply right-click their username and select the ‘Invite’ option from the dropdown menu – a straightforward process.
However, bear in mind that while DM invites do add a touch of personal connection, they might not always be practical, especially when dealing with larger groups of individuals.
Bots and Custom Emojis
Incorporating bots into channels along with voice channels does wonders by enhancing functionality and making your new server stand out among others. They serve multiple purposes, including auto-moderation tasks, thus reducing the need for human intervention significantly.
Automating Tasks on Your Server
The world of server management can seem overwhelming, but the challenges faced by Discord administrators today are actually pretty straightforward to overcome. Automation tools an example as Zapier offer a solution that simplifies tasks.
Conclusion
Establishing a new Discord server isn’t as intimidating as it might appear.
You’ve learned how to set up your own server, assign roles, default permissions, voice, and text channels, and customize it to suit your needs. We’ve also explored inviting members and automating tasks for efficiency.
The versatility of Discord, when combined with the right small business resources, offers remarkable potential to create a customized communication space that reflects your brand’s identity
No matter what stage you’re at in building or growing your business, understanding software tools like Discord can be game-changing.
If you’re ready to take the next step on this journey…There are countless resources available there designed specifically for entrepreneurs navigating today’s digital landscape. From mastering, right through to broader topics about running successful businesses.